# This page is being written
# GeyserModelEngine
> GitHub:https://github.com/zimzaza4/GeyserModelEngine
[English](README_EN.md) | [简体中文](README.md)
# how to insatll
Download the following plugins according to the server core
[GeyserUtils](https://github.com/zimzaza4/GeyserUtils)
[GeyserModelEngine](https://github.com/zimzaza4/GeyserModelEngine)
[zimzaza4's GeyserCustomEntity Fork](https://github.com/zimzaza4/Geyser)
[GeyserModelEnginePackGenerator](https://github.com/zimzaza4/GeyserModelEnginePackGenerator)
place `GeyserModelEngine` `Geyser自定义实体分支` in the plugins folder
根据服务端版本把`geyserutils-spigot`/`velocity`/`bungeecord`放入插件文件夹
`GeyserModelEnginePackGenerator` `geyserutils-geyser`放入geyser的扩展文件夹
先启动服务器生成相关配置文件,之后关闭服务器就安装好了
当然,先别急着用,现在你还得接着读下去
# 转换模型
现在`GeyserModelEnginePackGenerator`长大了已经学会会自己转换模型打包资源包了
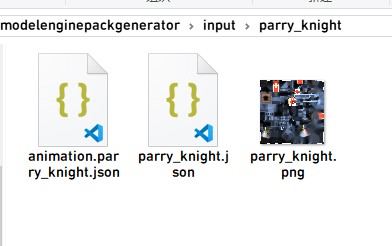
我们打开以下路径 `plugins/Geyser-Spigot/extensions/geysermodelenginepackgenerator/input/`
在此目录创建一个文件夹名为模型的ID,比如我有个模型id为`parry_knight`,那就命名为`parry_knight`
 > 每个模型都要有独立的模型文件夹
我们将模型、动画和纹理全部原封不动丢进这个文件夹
> 每个模型都要有独立的模型文件夹
我们将模型、动画和纹理全部原封不动丢进这个文件夹
 重启服务器或者重载geyser让他开始生成资源包
来到`plugins/Geyser-Spigot/extensions/geysermodelenginepackgenerator`目录
重启服务器或者重载geyser让他开始生成资源包
来到`plugins/Geyser-Spigot/extensions/geysermodelenginepackgenerator`目录
 将geysermodelenginepackgenerator生成的`generated_pack.zip`丢进Geyser-Spigot/packs目录就安装好了
最后一步,重载Geyser或者重启服务器加载资源包
注意! 他是检测模型的数量来打包的,如果数量没有变更不会执行。
想重新打包建议先删掉`generated_pack.zip`然后改uuid或者版本号
# 完结
恭喜你现在学会如何使用了,有BUG请发Issues
# 当前限制
* 不支持多贴图
* 待挖掘
# 常见问题
### 为什么生成模型后会变成史蒂夫?
可能你步骤错了,或者这个模型有问题无法转换?
将geysermodelenginepackgenerator生成的`generated_pack.zip`丢进Geyser-Spigot/packs目录就安装好了
最后一步,重载Geyser或者重启服务器加载资源包
注意! 他是检测模型的数量来打包的,如果数量没有变更不会执行。
想重新打包建议先删掉`generated_pack.zip`然后改uuid或者版本号
# 完结
恭喜你现在学会如何使用了,有BUG请发Issues
# 当前限制
* 不支持多贴图
* 待挖掘
# 常见问题
### 为什么生成模型后会变成史蒂夫?
可能你步骤错了,或者这个模型有问题无法转换?